Have you ever wondered how to turn a simple text prompt into structured, typed information immediately usable in your JavaScript applications?
In this blog post, we'll create a JavaScript function that does just that. Our function will take a country as input and output a curated list of cities perfect for a weekend getaway in that country.
For this task, we'll use several tools:
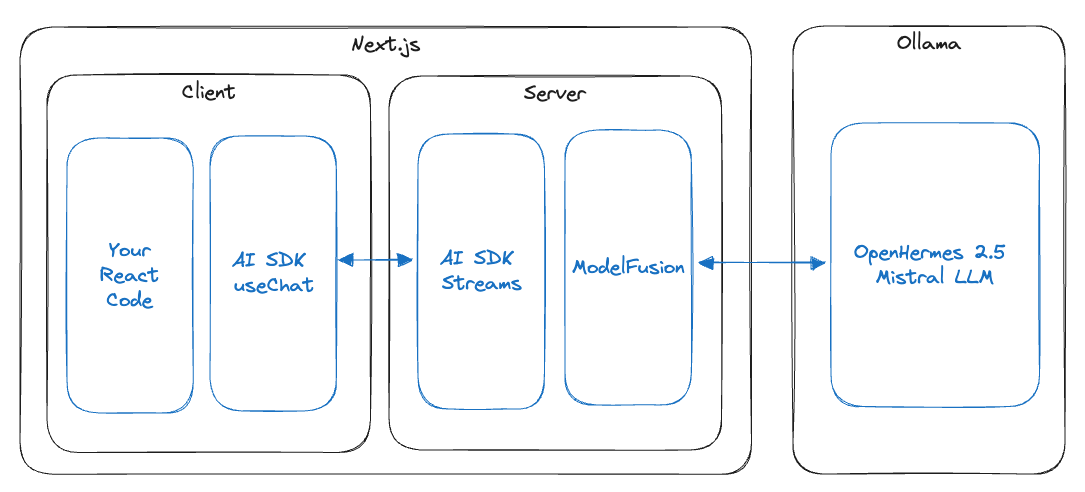
- Ollama is an application for running large language models (LLMs) on your local machine.
- Nous-Hermes-2 Mixtral 8x7B, a state-of-the-art open-source language model released in January 2024, provides the AI backbone for our task.
- Zod, a type validation library, ensures the structured data we generate is correctly formatted and typed.
- ModelFusion is an open-source library I'm developing to integrate AI models seamlessly into TypeScript projects. It provides an Ollama client and a generateObject function.
By the end of this post, you’ll see how these technologies work together to create a powerful solution for generating typed, structured data on your local machine. The example code is available in the ModelFusion repository.
The Power and Limits of Generating Structured Information
Imagine a large language model (LLM) as a librarian who has read the entire internet. Trained on a massive amount of text, these models encode information based on how often it appears in their training data. The more frequently something is mentioned, the better the model remembers it, just like a librarian with popular books.
These LLMs are fine-tuned to follow specific instructions, much like asking a librarian for a book recommendation. A general query, such as "What do I buy at the store?" might yield a broad list. In contrast, a more specific question like "Which apples do I buy at the store?" prompts a more targeted response. This precision in asking questions shapes the information the model provides.
LLMs can create structured output, e.g., matching a JSON schema, especially with engines like Ollama that ensure well-formed JSON output. This enables us to use the output directly in our applications.
However, it's essential to understand LLMs' limitations. When asked about less known or absent information, like the birthday of a personal relative, LLMs might 'hallucinate' or make up information. This is similar to a librarian guessing an answer when unsure. It's essential to consider how well-represented the information you need is in the model.
Installing Ollama and Nous-Hermes-2 Mixtral 8x7B
Ollama is an application for running LLMs on your machine. You can use it to run LLMs locally without needing a cloud connection. To install Ollama, follow the instructions on the Ollama website. Once Ollama is set up, you can download the model we will use for this blog post.
The Nous-Hermes-2 Mixtral 8x7B model is a state-of-the-art LLM released in January 2024. It is a fine-tune of the Mixtral mixture of experts model. Ollama provides the 4-bit quantized version of Nous-Hermes-2 Mixtral 8x7B, which is 26 GB big and requires at least 32 GB of RAM to run. Alternatively, you can use a smaller model, e.g., OpenHermes, a fine-tuned Mistral 7B, which can run on machines with 16 GB of RAM.
You can download the model with the following command: ollama pull nous-hermes2-mixtral (or ollama pull openhermes2.5-mistral for the smaller model).
With Ollama and the Nous-Hermes-2 Mixtral 8x7B model installed, we can look into setting up our project.
Setting up the Project
To set up a Node.js repository with TypeScript, Zod, and ModelFusion, you can use the ModelFusion Terminal App Starter.
-
Clone the starter repository:
git clone https://github.com/lgrammel/modelfusion-terminal-app-starter.git ollama-modelfusion-structured-information -
Move into the starter directory:
cd ollama-modelfusion-structured-information -
Install dependencies and add zod:
npm install zod
The starter example uses OpenAI by default for simple text generation. We will replace src/main.ts with our own code. Please open src/main.ts in your favorite editor and delete the contents.
Generating Structured Information
Now, we can start writing our code. First, we need to add the imports:
import {
  generateObject,
  jsonObjectPrompt,
  ollama,
  zodSchema,
} from "modelfusion";
import { z } from "zod";
Then, we add a listCityDestinations function that takes a country as input and returns a list of cities suitable for a weekend trip in that country.
const listCityDestinations = (country: string) =>
  generateObject({
    model: // ...
    schema: // ...
    prompt: // ...
  });
Let's look at this code in more detail. We use the generateObject function from ModelFusion to generate the list of cities. It has three main parts: the model, the schema, and the prompt.
Defining the Model
generateObject({
  model: ollama
    .ChatTextGenerator({
      model: "nous-hermes2-mixtral",
      temperature: 0,
    })
    .asObjectGenerationModel(jsonObjectPrompt.text()),
  //...
});
The model property specifies the LLM and the provider we want to use. We use the Ollama provider with their chat API by calling ollama.ChatTextGenerator, and specify the model that we want to use. We use the Nous-Hermes-2 Mixtral 8x7B DPO model by specifying model: "nous-hermes2-mixtral" (or openhermes2.5-mistral for the smaller model). We also set the temperature to 0 to reduce the randomness in the output.
The asObjectGenerationModel function adapts the text generator to an object generator. jsonObjectPrompt is a text-to-JSON mapping for object generation. It automatically enables JSON mode on Ollama API calls, injects the JSON schema into the prompt, and parses the JSON output.
jsonObjectPrompt.text() supports simple text prompts. You could also use jsonObjectPrompt.instruction() for more complex instruction prompts.
Specifying the Schema
generateObject({
  // ...
  schema: zodSchema(
    z.object({
      destinations: z.array(
        z.object({
          city: z.string(),
          region: z.string(),
          description: z.string(),
        })
      ),
    })
  ),
  // ...
});
The schema property contains a Zod-schema that specifies the structure of the output. We use Zod to define a schema that has a destinationsarray. Each destination has a city, region, and description field, all strings.
The ModelFusion zodSchema function wraps the Zod object definition. This is necessary because ModelFusion supports Zod and unchecked JSON schemas and is adaptable to other schema validation libraries such as Valibot.
The schema is converted to a JSON schema and injected into the prompt for the language model. It is also used to validate and type-check the parsed JSON output from the LLM.
Defining the Prompt
generateObject({
  // ...
  prompt:
    `List 5 city destinations in ${country} for weekend trips. ` +
    `Describe in 1 sentence what is unique and interesting about each destination.`,
});
The prompt definition is quite simple. We use a template string to define the prompt. The ${country} part is replaced with the country that we pass into the function. The prompt is a simple string since we use jsonObjectPrompt.text().
Calling the Function
async function main() {
  console.log(await listCityDestinations("France"));
}

main().catch(console.error);
Finally, we call the function with a country name. The function returns a promise, so we use await to wait for the result. We then print the result to the console.
Putting it all Together
This is the complete code for src/main.ts:
import {
  generateObject,
  jsonObjectPrompt,
  ollama,
  zodSchema,
} from "modelfusion";
import { z } from "zod";

const listCityDestinations = (country: string) =>
  generateObject({
    model: ollama
      .ChatTextGenerator({
        model: "nous-hermes2-mixtral",
        temperature: 0,
      })
      .asObjectGenerationModel(jsonObjectPrompt.text()),

    schema: zodSchema(
      z.object({
        destinations: z.array(
          z.object({
            city: z.string(),
            region: z.string(),
            description: z.string(),
          })
        ),
      })
    ),

    prompt:
      `List 5 city destinations in ${country} for weekend trips. ` +
      `Describe in 1 sentence what is unique and interesting about each destination.`,
  });

async function main() {
  console.log(await listCityDestinations("France"));
}

main().catch(console.error);
You can run it with the following command:
npm start
It will take a while to run (expect 20-30 seconds, but it varies by machine) since the model needs to generate many tokens.
Here is some example output:
❯ npm start

> [email protected] start
> npx tsx src/main.ts

{
  destinations: [
    {
      city: 'Paris',
      region: 'Île-de-France',
      description: 'The City of Lights, Paris offers iconic landmarks like the Eiffel Tower and Louvre Museum.'
    },
    {
      city: 'Lyon',
      region: 'Auvergne-Rhône-Alpes',
      description: 'Known for its gastronomy, Lyon is a UNESCO World Heritage site with Roman ruins and historic architecture.'
    },
    {
      city: 'Bordeaux',
      region: 'Nouvelle-Aquitaine',
      description: 'Famous for its wine production, Bordeaux boasts beautiful 18th-century architecture and a vibrant cultural scene.'
    },
    {
      city: 'Marseille',
      region: "Provence-Alpes-Côte d'Azur",
      description: 'A bustling port city, Marseille offers stunning coastal views, historic sites like the Basilique Notre-Dame de la Garde, and a rich cultural heritage.'
    },
    {
      city: 'Nice',
      region: "Provence-Alpes-Côte d'Azur",
      description: 'Known for its picturesque seaside promenade, Nice offers beautiful beaches, vibrant markets, and a rich artistic history.'
    }
  ]
}
Conclusion
In this post, we've explored how to use LLMs to generate structured information for JavaScript applications with Ollama, Zod, and ModelFusion. This approach illustrates one way to integrate AI into your projects.
You can experiment and adapt this example to your requirements. The possibilities are vast, and by tweaking the model, schema, and prompts, you can tailor the output to suit a wide range of applications. The example code is available in the ModelFusion repository.