
3 posts tagged with "nextjs"

View All Tags

· 15 min read
Lars Grammel

Streaming UIs with AI-generated on-demand content can unlock new user experiences.

Until now, most interfaces for dynamic content from large language models (LLMs) were chat interfaces or text autocompletion. With structured outputs, we can now stream complex content and show it incrementally in UI components like lists and tables.

In this tutorial, we will build a travel activity planner with Next.js that uses GPT-4 to generate a list of activities for a given destination and length of stay. The activity list will be streamed to the client and displayed in a React component.

Here is an overview of the tutorial:

Let's get started.

1. Application Overview

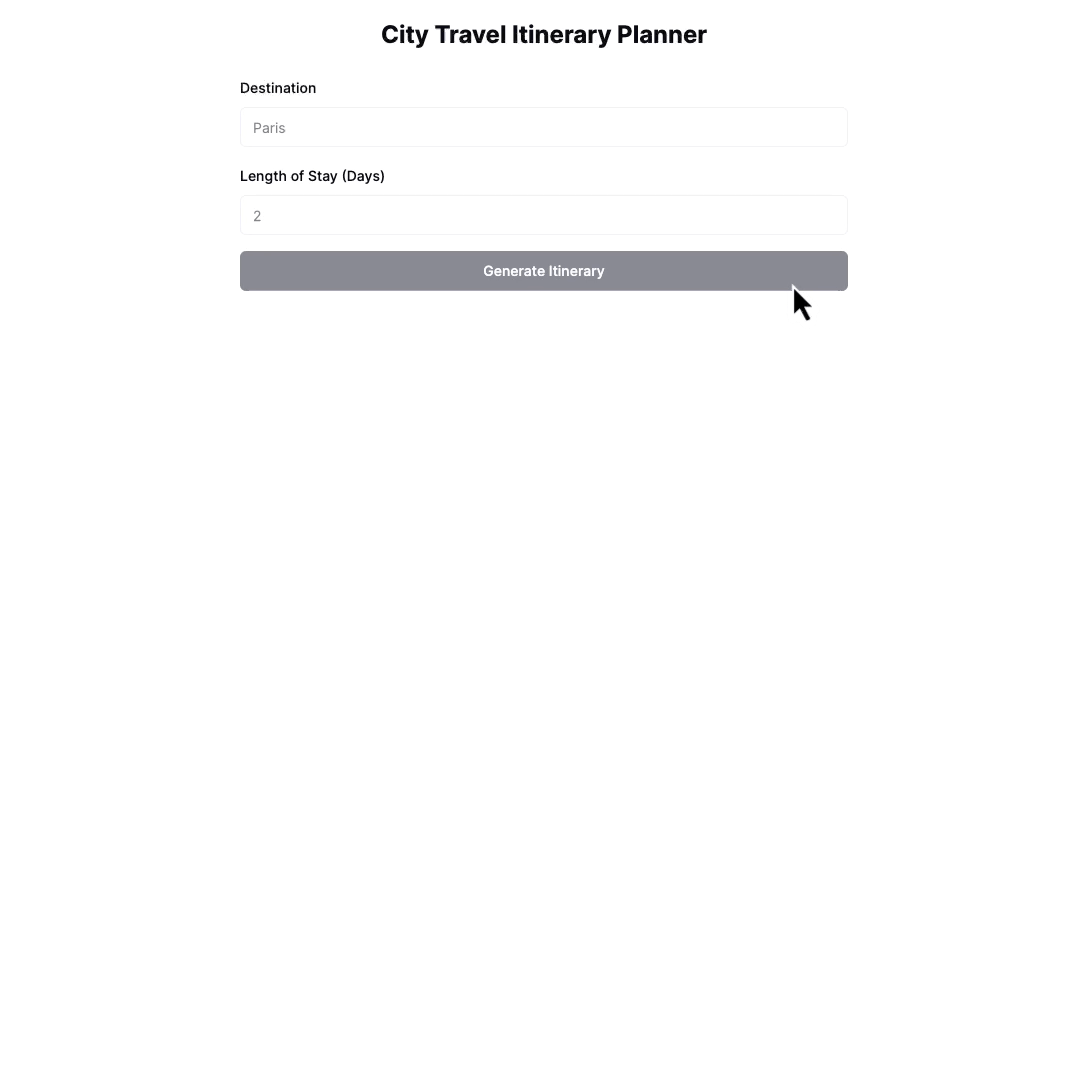
The travel acitivity planner is a simple application that uses GPT-4 to generate a list of activities for a given destination and length of stay. The activity list is streamed to the client and displayed in a React component. Here is a screencast of the final application:

Screencast of the final application

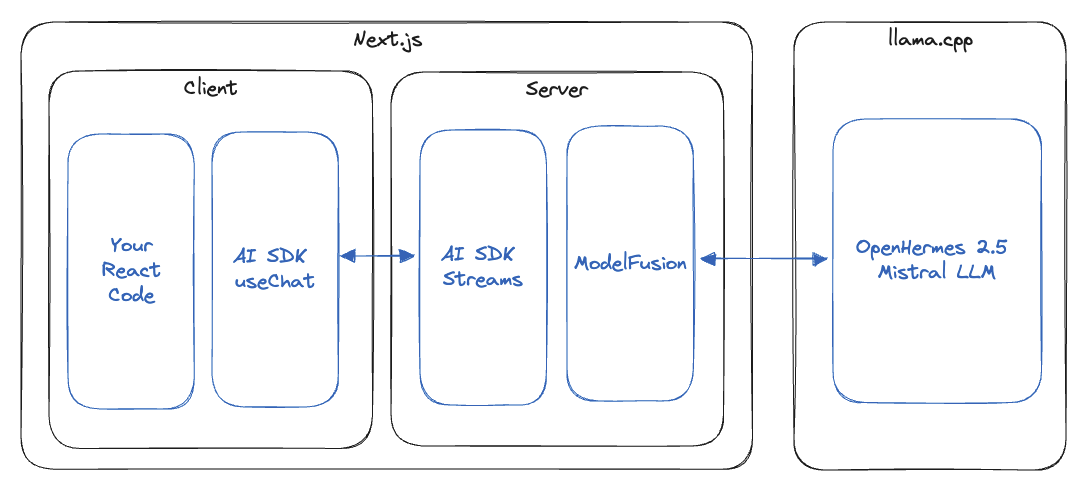
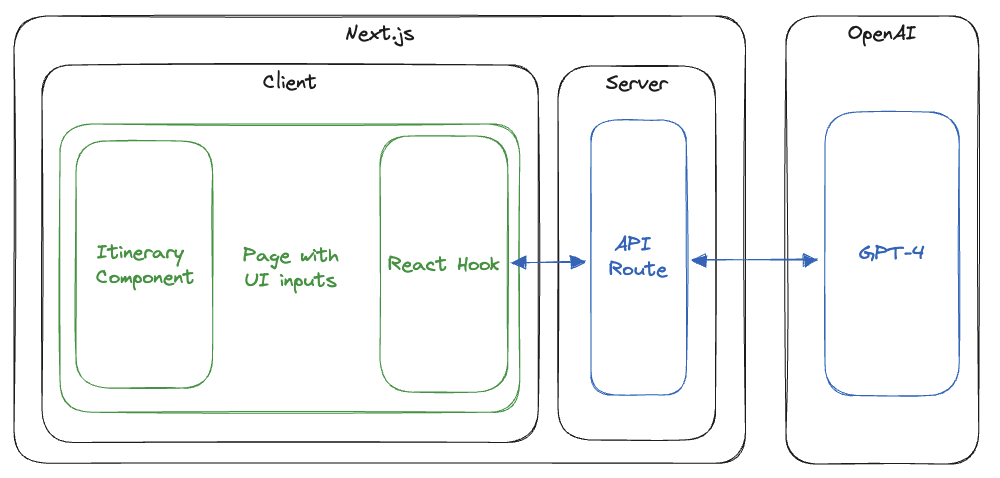
The architecture is pretty straightforward. On the front end, there is a page that contains the inputs and a submit button. It also displays the activity list. The page uses a React hook to call an API route, which in turn calls GPT-4 and streams the activity list to the client:

Architecture of the application

This tutorial will guide you through creating the application. It is split into the following parts:

2. Project Setup (Next.js)

The next step is to create the foundational structure of our Next.js project. Next.js 14 will be used to build our application's frontend and API route.

Here are the steps to create the Next.js project:

  1. Execute the following command in your terminal to create a new Next.js project:

    npx create-next-app@latest nextjs-openai-object-streaming
  2. You will be prompted to configure various aspects of your Next.js application. Here are the settings for our project:

    Would you like to use TypeScript? Yes
    Would you like to use ESLint? Yes
    Would you like to use Tailwind CSS? Yes
    Would you like to use `src/` directory? Yes
    Would you like to use App Router? (recommended) Yes
    Would you like to customize the default import alias? No

    These settings enable TypeScript for robust type-checking, ESLint for code quality, and Tailwind CSS for styling. Using the src/ directory and App Router enhances the project structure and routing capabilities.

  3. Once the project is initialized, navigate to the project directory:

    cd nextjs-openai-object-streaming
  4. ModelFusion uses async_hooks in Node.js. This can cause problems with the Next.js compilation of browser assets. To fix this, replace the content of next.config.mjs with:

    /** @type {import('next').NextConfig} */
    const nextConfig = {
    webpack: (config, { isServer }) => {
    if (isServer) {
    return config;
    }

    config.resolve = config.resolve ?? {};
    config.resolve.fallback = config.resolve.fallback ?? {};

    // async hooks is not available in the browser:
    config.resolve.fallback.async_hooks = false;

    return config;
    },
    };

    export default nextConfig;

You have successfully created and configured your Next.js project by following these steps. We will later integrate the AI functionalities using OpenAI and ModelFusion. The next part of the tutorial will guide you through installing several libraries that will be used in the project.

Verify your setup

You can verify your setup by running npm run dev in your terminal and navigating to http://localhost:3000 in your browser. You should see the default Next.js page.

3. GPT-4 API Access

We will generate JSON with GPT-4 in our application by calling the OpenAI API. You need to sign up for the OpenAI platform and get an OpenAI API key to use GPT-4.

You can then add the API key to your project by creating a file under .env.local with the following content:

OPENAI_API_KEY=<your-api-key>

Next.js automatically loads this file, and the API key is available in the process.env object.

4. Installing Libraries

We will use the following libraries in our project: shadcn/ui, zod, and ModelFusion.

shadcn/ui

shadcn/ui is a UI component library that generates ready-made React components inside your project. It is used to create several UI components for the front end of our application.

info

shadcn/ui lets you modify the generated components to fit your needs, which is impossible with other UI component libraries such as Material UI.

You can install it and generate the components with the following steps:

  1. Setup shadcn/ui:

    npx shadcn-ui@latest init
  2. You will again be prompted to configure various settings. Here is what I used:

    Which style would you like to use? Default
    Which color would you like to use as base color? Slate
    Would you like to use CSS variables for colors? Yes
  3. We need button, label, and input components. You can generate them with the following commands:

    npx shadcn-ui@latest add button
    npx shadcn-ui@latest add label
    npx shadcn-ui@latest add input

Our UI components ar now ready to be used in our project. Let's install the next library.

Zod

Zod is a TypeScript-first schema validation library. We will use it to define a schema for the data generated by GPT-4. You can add it to the project with the following command:

npm install zod
Zod and GPT-4

Zod is great for generating typed JSON from GPT-4, because you can easily convert Zod schemas to JSON schemas using zod-to-json-schema and include descriptions for each property. The JSON schemas are passed to GPT-4 as function definitions or in the prompt (when you are using JSON mode).

ModelFusion

ModelFusion is an AI integration library that I am developing. It enables you to integrate AI models into your JavaScript and TypeScript applications. You can install it with the following command:

npm install modelfusion

With these libraries installed, we are ready to start implementing our application.

5. Implementing The Application

Our application is a simple travel activity planner. You can give it a destination and the length of your stay, and it will generate a list of activities for you to do, grouped by day.

Our implementation will have the following components:

  • A schema that defines the structure of the activity list
  • An API route that calls GPT-4 and generates the activity list
  • A React hook that calls the API route and contains the activity list as a state
  • A main page with the UI controls
  • An activity list component that displays the (partial) activity list

Let's go through each of these components.

Schema

The iterator schema defines the structure of the activity list. It is also passed into GPT-4 as part of the prompt, either as a function definition or as text.

To define the schema, create a file under src/lib/itinerary-schema.ts with the following content:

import { zodSchema } from "modelfusion";
import { z } from "zod";

export const itinerarySchema = zodSchema(
z.object({
days: z.array(
z.object({
theme: z.string(),
activities: z.array(
z.object({
name: z.string(),
description: z.string(),
duration: z.number(),
})
),
})
),
})
);

export type Itinerary = typeof itinerarySchema._partialType;

The schema is defined using Zod, starting with z.object. It contains an array of days, each of which has a theme and an array of activities. Each activity has a name, description, and duration.

The Zod schema is wrapped with zodSchema to map it to a ModelFusion schema. ModelFusion supports several schema formats, including Zod and unchecked JSON schemas. It also exposes a _partialType property that can be used to define the type of the activity list.

API Route

The API route calls GPT-4 and generates the activity list as a typed JSON object. It then streams the object to the client using the ObjectStreamResponse class.

API keys

The API route is necessary to keep your OpenAI API key on the server. This is important to prevent unauthorized access to your API key.

You can setup the route by creating a file under src/app/api/stream-objects/route.ts with the following content:

import { itinerarySchema } from "@/lib/itinerary-schema";
import {
ObjectStreamResponse,
jsonObjectPrompt,
openai,
streamObject,
} from "modelfusion";

export const runtime = "edge";

export async function POST(req: Request) {
const { destination, lengthOfStay } = await req.json();

const objectStream = await streamObject({
model: openai
.ChatTextGenerator({
model: "gpt-4-1106-preview",
maxGenerationTokens: 2500,
})
.asObjectGenerationModel(jsonObjectPrompt.instruction()),

schema: itinerarySchema,

prompt: {
system:
`You help planning travel itineraries. ` +
`Respond to the users' request with a list ` +
`of the best stops to make in their destination.`,

instruction:
`I am planning a trip to ${destination} for ${lengthOfStay} days. ` +
`Please suggest the best tourist activities for me to do.`,
},
});

return new ObjectStreamResponse(objectStream);
}

Let's go through the code in detail. We set up a POST route that is run in the Edge runtime:

export const runtime = "edge";

export async function POST(req: Request) {
// ...
}

The first step is to extract the destination and length of stay from the request body:

const { destination, lengthOfStay } = await req.json();

The main part is calling GPT-4 with the ModelFusion streamObject function:

const objectStream = await streamObject({
model: openai
.ChatTextGenerator({
model: "gpt-4-1106-preview",
maxGenerationTokens: 2500,
})
.asObjectGenerationModel(jsonObjectPrompt.instruction()),

schema: itinerarySchema,

prompt: {
system:
`You help planning travel itineraries. ` +
`Respond to the users' request with a list ` +
`of the best stops to make in their destination.`,

instruction:
`I am planning a trip to ${destination} for ${lengthOfStay} days. ` +
`Please suggest the best tourist activities for me to do.`,
},
});

We call streamObject with GPT-4 turbo (gpt-4-1106-preview) configured as an object generation model. The jsonObjectPrompt.instruction() function uses the OpenAI JSON response format and injects the schema into the prompt.

Function calling

You can also use function calling (or tool calling) to get JSON output from GPT-3.5 or GPT-4. If you do not have access to GPT-4, check out the ModelFusion generateObject function for more information on function calling with GPT-3.5.

In addition to the model, we also pass the previously defined schema and the prompt. The prompt is the crucial part. We are using an instruction prompt with a system and an instruction part. The system part defines the role of the AI model. In our case, it is a travel itinerary planner. The instruction part defines the user request.

Finally, we return the partial objects as an ObjectStreamResponse (docs), which serializes them for transport to the client:

return new ObjectStreamResponse(objectStream);
note

We are relying on GPT-4 to know about tourist destinations and activities. This assumption is reasonable for popular destinations because they are likely very well represented in the training set of GPT-4, and we get good answers.

However, the less common a destination is, the more likely it is that GPT-4 will not know about it and hallucinate activities. We can test this by entering a fictional destination like Mars Main Hub.

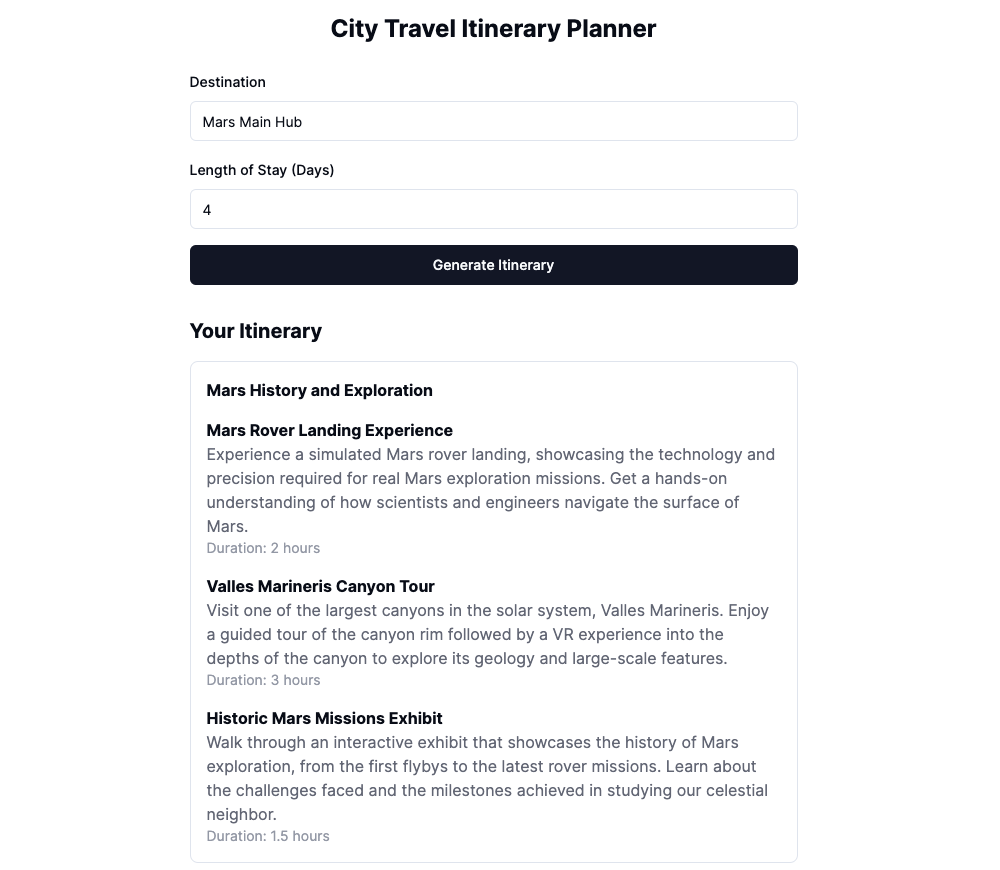
Hallucination of activities for a fictional destination.

You can use additional techniques such as Retrieval Augmented Generation (RAG) if you need more accurate responses.

We have now implemented the API route. Let's move on to the React hook.

React Hook

We use a custom React hook to call the API route and store the activity list as a state. Create a file under src/hooks/use-itinerary.ts with the following content:

import { Itinerary, itinerarySchema } from "@/lib/itinerary-schema";
import { ObjectStreamFromResponse } from "modelfusion";
import { useCallback, useState } from "react";

export function useItinerary() {
const [isGenerating, setIsGenerating] = useState(false);
const [itinerary, setItinerary] = useState<Itinerary>();

const generateItinerary = useCallback(
async ({
destination,
lengthOfStay,
}: {
destination: string;
lengthOfStay: string;
}) => {
setItinerary(undefined);
setIsGenerating(true);

try {
const response = await fetch("/api/stream-objects", {
method: "POST",
body: JSON.stringify({ destination, lengthOfStay }),
});

const stream = ObjectStreamFromResponse({
schema: itinerarySchema,
response,
});

for await (const { partialObject } of stream) {
setItinerary(partialObject);
}
} finally {
setIsGenerating(false);
}
},
[]
);

return {
isGeneratingItinerary: isGenerating,
generateItinerary,
itinerary,
};
}

The hook sets up two state variables: isGenerating and itinerary:

const [isGenerating, setIsGenerating] = useState(false);
const [itinerary, setItinerary] = useState<Itinerary>();

The isGenerating variable can be used to show a loading indicator until the first partial object is received. The itinerary variable contains the generated activity list. It includes partial objects that are received during the generation process.

The main part of the hook is the generateItinerary function:

const generateItinerary = useCallback(
async ({
destination,
lengthOfStay,
}: {
destination: string;
lengthOfStay: string;
}) => {
setItinerary(undefined);
setIsGenerating(true);

try {
const response = await fetch("/api/stream-objects", {
method: "POST",
body: JSON.stringify({ destination, lengthOfStay }),
});

const stream = ObjectStreamFromResponse({
schema: itinerarySchema,
response,
});

for await (const { partialObject } of stream) {
setItinerary(partialObject);
}
} finally {
setIsGenerating(false);
}
},
[]
);

It is wrapped with useCallback to prevent unnecessary re-renders. The function first resets the state variables and then calls the API route with the destination and length of stay.

The response is then passed into ObjectStreamFromResponse, deserializing the content into a simplified object stream. The stream is then incrementally processed, and the partial objects are stored in the itinerary state variable.

Finally, the isGenerating variable is reset to false, even if an error occurs during generation.

The React hook exposes the states and the callback function as isGeneratingItinerary, generateItinerary, and itinerary helpers. Let's use them on the main page.

Itinerary Component

We need a React component to display the activity list. Create a file under src/components/ui/itinerary-view.tsx with the following content:

import { Itinerary } from "@/lib/itinerary-schema";

export const ItineraryView = ({ itinerary }: { itinerary?: Itinerary }) => (
<div className="mt-8">
{itinerary?.days && (
<>
<h2 className="text-xl font-bold mb-4">Your Itinerary</h2>
<div className="space-y-4">
{itinerary.days.map(
(day, index) =>
day && (
<div key={index} className="border rounded-lg p-4">
<h3 className="font-bold">{day.theme ?? ""}</h3>

{day.activities?.map(
(activity, index) =>
activity && (
<div key={index} className="mt-4">
{activity.name && (
<h4 className="font-bold">{activity.name}</h4>
)}
{activity.description && (
<p className="text-gray-500">
{activity.description}
</p>
)}
{activity.duration && (
<p className="text-sm text-gray-400">{`Duration: ${activity.duration} hours`}</p>
)}
</div>
)
)}
</div>
)
)}
</div>
</>
)}
</div>
);

The component takes the activity list as a prop and displays it. It uses Tailwind CSS for styling.

The main difference to typical React components is that it is designed to handle partial data. Most properties and values can be undefined while GPT-4 generates the activity list. For this reason, the component uses optional chaining (?.), nullish coalescence (??), and truthy checks with && in many places.

With the component and the React hook in place, we can now implement the main page.

Main Page

The main page contains the UI controls for the application, the React hook, and the itinerary component. It also uses Tailwind CSS for styling.

Replace the content of src/app/page.tsx with the following code:

"use client";

import { Button } from "@/components/ui/button";
import { Input } from "@/components/ui/input";
import { ItineraryView } from "@/components/ui/itinerary-view";
import { Label } from "@/components/ui/label";
import { useItinerary } from "@/hooks/use-itinerary";
import { useState } from "react";

export default function Main() {
const [destination, setDestination] = useState("");
const [lengthOfStay, setLengthOfStay] = useState("");

const { isGeneratingItinerary, generateItinerary, itinerary } =
useItinerary();

return (
<div className="w-full max-w-2xl mx-auto p-4 md:p-6 lg:p-8">
<h1 className="text-2xl font-bold text-center mb-6">
City Travel Itinerary Planner
</h1>

<form
className="space-y-4"
onSubmit={(e) => {
e.preventDefault();
generateItinerary({ destination, lengthOfStay });
}}
>
<div className="space-y-2">
<Label htmlFor="destination">Destination</Label>
<Input
id="destination"
placeholder="Enter your destination"
required
value={destination}
disabled={isGeneratingItinerary}
onChange={(e) => setDestination(e.target.value)}
/>
</div>
<div className="space-y-2">
<Label htmlFor="length-of-stay">Length of Stay (Days)</Label>
<Input
id="length-of-stay"
placeholder="Enter the length of your stay (up to 7 days)"
required
type="number"
min="1" // Minimum length of stay
max="7" // Maximum length of stay
value={lengthOfStay}
disabled={isGeneratingItinerary}
onChange={(e) => setLengthOfStay(e.target.value)}
/>
</div>
<Button
className="w-full"
type="submit"
disabled={isGeneratingItinerary}
>
Generate Itinerary
</Button>
</form>

<ItineraryView itinerary={itinerary} />
</div>
);
}

The page contains inputs for the destination and the length of stay. Both inputs are linked to state variables.

The useItinerary hook generates the activity list when the form is submitted. It provides the isGeneratingItinerary and itinerary state variables.

The isGeneratingItinerary variable is used to turn off the form and the button while the activity list is being generated. The itinerary variable is passed into the ItineraryView component.

6. Running The Application

You can now run the application with the following command:

npm run dev

The application will be available at http://localhost:3000. You can enter a destination and the length of your stay and click the "Generate Itinerary" button to generate the activity list.

7. Conclusion

In this tutorial, we built a travel planner application using Next.js, GPT-4, and ModelFusion. This application shows how to generate and stream structured data from GPT-4 to a web browser. It also demonstrates how to display this data using React components.

You can apply this method to develop various applications. These applications can generate and send structured information from large AI models. It's a new way to use AI outputs in user interfaces. If you want to explore more, experiment with the code. Happy coding!

· 8 min read
Lars Grammel

In this blog post, we'll build a Next.js chatbot that runs on your computer. We'll use Llama.cpp to serve the OpenHermes 2.5 Mistral LLM (large language model) locally, the Vercel AI SDK to handle stream forwarding and rendering, and ModelFusion to integrate Llama.cpp with the Vercel AI SDK. The chatbot will be able to generate responses to user messages in real-time.

The architecture looks like this:

You can find a full Next.js, Vercel AI SDK, Llama.cpp & ModelFusion starter with more examples here: github/com/lgrammel/modelfusion-Llamacpp-nextjs-starter

This blog post explains step by step how to build the chatbot. Let's get started!

Setup Llama.cpp

The first step to getting started with our local chatbot is to setup Llama.cpp.

Llama.cpp is an LLM (large language model) inference engine implemented in C++ that allows us to run LLMs like OpenHermes 2.5 Mistral on your machine. This is crucial for our chatbot as it forms the backbone of its AI capabilities.

Step 1: Build Llama.cpp

Llama.cpp requires you to clone the repository and build it on your machine. Please follow the instructions on the Llama.cpp README:

  1. Open your terminal or command prompt.

  2. Clone the repository:

    git clone https://github.com/ggerganov/llama.cpp
    cd llama.cpp
  3. Compile llama.cpp:

    1. Linux/Mac: Run make
    2. Windows or other setups: Please follow the instructions on the Llama.cpp README.

Step 2: Downloading OpenHermes 2.5 Mistral GGUF

Once Llama.cpp is ready, you'll need to pull the specific LLM we will be using for this project, OpenHermes 2.5 Mistral.

  1. Download the OpenHermes 2.5 Mistral model from HuggingFace. I'll use openhermes-2.5-mistral-7b.Q4_K_M.gguf in this tutorial.

  2. Move the model file into the models/ directory of your local Llama.cpp repository.

Llama.cpp runs LLMs in a format called GGUF (GPT-Generated Unified Format). You can find many GGUF models on HuggingFace. 4-bit quantized models that fit in your machine's memory, e.g. 7B param models on a 8GB or 16GB machine, are usually the best models to run.

info

Quantization involves reducing the precision of the numerical values representing the model's weights, often from 32-bit floating points to lower precision formats like 4-bit. This decreases the model's memory footprint and computational requirements.

Step 3: Start the Llama.cpp Server

You can now start the Llama.cpp server by running the following command in your terminal (Mac/Linux):

./server -m models/openhermes-2.5-mistral-7b.Q4_K_M.gguf

After completing these steps, your system is running a Llama.cpp server with the OpenHermes 2.5 Mistral model, ready to be integrated into our Next.js chatbot.

Creating the Next.js Project

The next step is to create the foundational structure of our chatbot using Next.js. Next.js will be used to build our chatbot application's frontend and API routes.

Here are the steps to create the Next.js project:

  1. Execute the following command in your terminal to create a new Next.js project:

    npx create-next-app@latest llamacpp-nextjs-chatbot
  2. You will be prompted to configure various aspects of your Next.js application. Here are the settings for our chatbot project:

    Would you like to use TypeScript? Yes
    Would you like to use ESLint? Yes
    Would you like to use Tailwind CSS? Yes
    Would you like to use `src/` directory? Yes
    Would you like to use App Router? (recommended) Yes
    Would you like to customize the default import alias? No

    These settings enable TypeScript for robust type-checking, ESLint for code quality, and Tailwind CSS for styling. Using the src/ directory and App Router enhances the project structure and routing capabilities.

  3. Once the project is initialized, navigate to the project directory:

    cd llamacpp-nextjs-chatbot

By following these steps, you have successfully created and configured your Next.js project. This forms the base of our chatbot application, where we will later integrate the AI functionalities using Llama.cpp and ModelFusion. The next part of the tutorial will guide you through installing additional libraries and setting up the backend logic for the chatbot.

tip

You can verify your setup by running npm run dev in your terminal and navigating to http://localhost:3000 in your browser. You should see the default Next.js page.

Installing the Required Libraries

We will use several libraries to build our chatbot. Here is an overview of the libraries we will use:

  • Vercel AI SDK: The Vercel AI SDK provides React hooks for creating chats (useChat) as well as streams that forward AI responses to the frontend (StreamingTextResponse).
  • ModelFusion: ModelFusion is a library for building multi-modal AI applications that I've been working on. It provides a streamText function that calls AI models and returns a streaming response. ModelFusion also contains a Llama.cpp integration that we will use to access the OpenHermes 2.5 Mistral model.
  • ModelFusion Vercel AI SDK Integration: The @modelfusion/vercel-ai integration provides a ModelFusionTextStream that adapts ModelFusion's text streaming to the Vercel AI SDK's streaming response.

You can run the following command in the chatbot project directory to install all libraries:

npm install --save ai modelfusion @modelfusion/vercel-ai

You have now installed all the libraries required for building the chatbot. The next section of the tutorial will guide you through creating an API route for handling chat interactions.

Creating an API Route for the Chatbot

Creating the API route for the Next.js app router is the next step in building our chatbot. The API route will handle the chat interactions between the user and the AI.

Create the api/chat/ directory in src/app/ directory of your project and create a new file named route.ts to serve as our API route file.

The API route requires several important imports from the ai, modelfusion, and @modelfusion/vercel-ai libraries. These imports bring in necessary classes and functions for streaming AI responses and processing chat messages.

import { ModelFusionTextStream, asChatMessages } from "@modelfusion/vercel-ai";
import { Message, StreamingTextResponse } from "ai";
import { llamacpp, streamText } from "modelfusion";

We will use the edge runtime:

export const runtime = "edge";

The route itself is a POST request that takes a list of messages as input:

export async function POST(req: Request) {
// useChat will send a JSON with a messages property:
const { messages }: { messages: Message[] } = await req.json();

// ...
}

We initialize a ModelFusion text generation model for calling the Llama.cpp chat API with the OpenHermes 2.5 Mistral model. The .withChatPrompt() method creates an adapted model for chat prompts:

const model = llamacpp
.CompletionTextGenerator({
promptTemplate: llamacpp.prompt.ChatML, // OpenHermes uses the ChatML prompt format
temperature: 0,
cachePrompt: true, // Cache previous processing for fast responses
maxGenerationTokens: 1024, // Room for answer
})
.withChatPrompt();

Next, we create a ModelFusion chat prompt from the AI SDK messages:

const prompt = {
system: "You are an AI chatbot. Follow the user's instructions carefully.",

// map Vercel AI SDK Message to ModelFusion ChatMessage:
messages: asChatMessages(messages),
};

The asChatMessages helper converts the messages from the Vercel AI SDK to ModelFusion chat messages.

With the prompt and the model, you can then use ModelFusion to call Llama.cpp and generate a streaming response:

const textStream = await streamText({ model, prompt });

Finally you can return the streaming text response with the Vercel AI SDK. The ModelFusionTextStream adapts ModelFusion's streaming response to the Vercel AI SDK's streaming response:

// Return the result using the Vercel AI SDK:
return new StreamingTextResponse(ModelFusionTextStream(textStream));

Adding the Chat Interface

We need to create a dedicated chat page to bring our chatbot to life on the frontend. This page will be located at src/app/page.tsx and will leverage the useChat hook from the Vercel AI SDK. The useChat hook calls the /api/chat route and processes the streaming response as an array of messages, rendering each token as it arrives.

// src/app/page.tsx
"use client";

import { useChat } from "ai/react";

export default function Chat() {
const { messages, input, handleInputChange, handleSubmit } = useChat();

return (
<div className="flex flex-col w-full max-w-md py-24 mx-auto stretch">
{messages.map((message) => (
<div
key={message.id}
className="whitespace-pre-wrap"
style={{ color: message.role === "user" ? "black" : "green" }}
>
<strong>{`${message.role}: `}</strong>
{message.content}
<br />
<br />
</div>
))}

<form onSubmit={handleSubmit}>
<input
className="fixed bottom-0 w-full max-w-md p-2 mb-8 border border-gray-300 rounded shadow-xl"
value={input}
placeholder="Say something..."
onChange={handleInputChange}
/>
</form>
</div>
);
}

It's important to clean up the global styles for a more visually appealing chat interface. By default, the Next.js page is dark. We clean up src/app/globals.css to make it readable:

@tailwind base;
@tailwind components;
@tailwind utilities;

Running the Chatbot Application

With the chat page in place, it's time to run our chatbot app and see the result of our hard work.

You can launch the development server by running the following command in your terminal:

npm run dev

You can now navigate to http://localhost:3000 in your browser to see the chat page. You can interact with the chatbot by typing messages into the input field. The chatbot will respond to your messages in real-time.

Below is a screenshot of what you can expect your chatbot interface to look like when you run the application:

Conclusion

And there you have it—a fully functional local chatbot built with Next.js, Llama.cpp, and ModelFusion at your fingertips. We've traversed the path from setting up our development environment, integrating a robust language model, and spinning up a user-friendly chat interface.

The code is intended as a starting point for your projects. Have fun exploring!

· 8 min read
Lars Grammel

In this blog post, we'll build a Next.js chatbot that runs on your computer. We'll use Ollama to serve the OpenHermes 2.5 Mistral LLM (large language model) locally, the Vercel AI SDK to handle stream forwarding and rendering, and ModelFusion to integrate Ollama with the Vercel AI SDK. The chatbot will be able to generate responses to user messages in real-time.

The architecture looks like this:

You can find a full Next.js, Vercel AI SDK, Ollama & ModelFusion starter with more examples here: github/com/lgrammel/modelfusion-ollama-nextjs-starter

This blog post explains step by step how to build the chatbot. Let's get started!

Installing Ollama

The first step to getting started with our local chatbot is installing Ollama. Ollama is a versatile platform that allows us to run LLMs like OpenHermes 2.5 Mistral on your machine. This is crucial for our chatbot as it forms the backbone of its AI capabilities.

Step 1: Download Ollama

  1. Visit the official Ollama website.
  2. Follow the instructions provided on the site to download and install Ollama on your machine.

Step 2: Pulling OpenHermes 2.5 Mistral

Once Ollama is installed, you'll need to pull the specific LLM we will be using for this project, OpenHermes 2.5 Mistral. As of November 2023, it is one of the best open-source LLMs in the 7B parameter class. You need at least a MacBook M1 with 8GB of RAM or a similarly compatible computer to run it.

  1. Open your terminal or command prompt.
  2. Run the following command:
    ollama pull openhermes2.5-mistral

This command will download the LLM and store it on your machine. You can now use it to generate text.

tip

You can find the best-performing open-source LLMs on the HuggingFace Open LLM Leaderboard. They are ranked using a mix of benchmarks and grouped into different parameter classes so you can choose the best LLM for your machine. Many of the LLMs on the leaderboard are available on Ollama.

After completing these steps, your system is equipped with Ollama and the OpenHermes 2.5 Mistral model, ready to be integrated into our Next.js chatbot.

Creating the Next.js Project

The next step is to create the foundational structure of our chatbot using Next.js. Next.js will be used to build our chatbot application's frontend and API routes.

Here are the steps to create the Next.js project:

  1. Execute the following command in your terminal to create a new Next.js project:

    npx create-next-app@latest ollama-nextjs-chatbot
  2. You will be prompted to configure various aspects of your Next.js application. Here are the settings for our chatbot project:

    Would you like to use TypeScript? Yes
    Would you like to use ESLint? Yes
    Would you like to use Tailwind CSS? Yes
    Would you like to use `src/` directory? Yes
    Would you like to use App Router? (recommended) Yes
    Would you like to customize the default import alias? No

    These settings enable TypeScript for robust type-checking, ESLint for code quality, and Tailwind CSS for styling. Using the src/ directory and App Router enhances the project structure and routing capabilities.

  3. Once the project is initialized, navigate to the project directory:

    cd ollama-nextjs-chatbot

By following these steps, you have successfully created and configured your Next.js project. This forms the base of our chatbot application, where we will later integrate the AI functionalities using Ollama and ModelFusion. The next part of the tutorial will guide you through installing additional libraries and setting up the backend logic for the chatbot.

tip

You can verify your setup by running npm run dev in your terminal and navigating to http://localhost:3000 in your browser. You should see the default Next.js page.

Installing the Required Libraries

We will use several libraries to build our chatbot. Here is an overview of the libraries we will use:

  • Vercel AI SDK: The Vercel AI SDK provides React hooks for creating chats (useChat) as well as streams that forward AI responses to the frontend (StreamingTextResponse).
  • ModelFusion: ModelFusion is a library for building multi-modal AI applications that I've been working on. It provides a streamText function that calls AI models and returns a streaming response. ModelFusion also contains an Ollama integration that we will use to access the OpenHermes 2.5 Mistral model.
  • ModelFusion Vercel AI SDK Integration: The @modelfusion/vercel-ai integration provides a ModelFusionTextStream that adapts ModelFusion's text streaming to the Vercel AI SDK's streaming response.

You can run the following command in the chatbot project directory to install all libraries:

npm install --save ai modelfusion @modelfusion/vercel-ai

You have now installed all the libraries required for building the chatbot. The next section of the tutorial will guide you through creating an API route for handling chat interactions.

Creating an API Route for the Chatbot

Creating the API route for the Next.js app router is the next step in building our chatbot. The API route will handle the chat interactions between the user and the AI.

Create the api/chat/ directory in src/app/ directory of your project and create a new file named route.ts to serve as our API route file.

The API route requires several important imports from the ai, modelfusion, and @modelfusion/vercel-ai libraries. These imports bring in necessary classes and functions for streaming AI responses and processing chat messages.

import { ModelFusionTextStream, asChatMessages } from "@modelfusion/vercel-ai";
import { Message, StreamingTextResponse } from "ai";
import { ollama, streamText } from "modelfusion";

We will use the edge runtime:

export const runtime = "edge";

The route itself is a POST request that takes a list of messages as input:

export async function POST(req: Request) {
// useChat will send a JSON with a messages property:
const { messages }: { messages: Message[] } = await req.json();

// ...
}

We initialize a ModelFusion text generation model for calling the Ollama chat API with the OpenHermes 2.5 Mistral model. The .withChatPrompt() method creates an adapted model for chat prompts:

const model = ollama
.ChatTextGenerator({ model: "openhermes2.5-mistral" })
.withChatPrompt();

Next, we create a ModelFusion chat prompt from the AI SDK messages:

const prompt = {
system: "You are an AI chatbot. Follow the user's instructions carefully.",

// map Vercel AI SDK Message to ModelFusion ChatMessage:
messages: asChatMessages(messages),
};

The asChatMessages helper converts the messages from the Vercel AI SDK to ModelFusion chat messages.

With the prompt and the model, you can then use ModelFusion to call Ollama and generate a streaming response:

const textStream = await streamText({ model, prompt });

Finally you can return the streaming text response with the Vercel AI SDK. The ModelFusionTextStream adapts ModelFusion's streaming response to the Vercel AI SDK's streaming response:

// Return the result using the Vercel AI SDK:
return new StreamingTextResponse(ModelFusionTextStream(textStream));

Adding the Chat Interface

We need to create a dedicated chat page to bring our chatbot to life on the frontend. This page will be located at src/app/page.tsx and will leverage the useChat hook from the Vercel AI SDK. The useChat hook calls the /api/chat route and processes the streaming response as an array of messages, rendering each token as it arrives.

// src/app/page.tsx
"use client";

import { useChat } from "ai/react";

export default function Chat() {
const { messages, input, handleInputChange, handleSubmit } = useChat();

return (
<div className="flex flex-col w-full max-w-md py-24 mx-auto stretch">
{messages.map((message) => (
<div
key={message.id}
className="whitespace-pre-wrap"
style={{ color: message.role === "user" ? "black" : "green" }}
>
<strong>{`${message.role}: `}</strong>
{message.content}
<br />
<br />
</div>
))}

<form onSubmit={handleSubmit}>
<input
className="fixed bottom-0 w-full max-w-md p-2 mb-8 border border-gray-300 rounded shadow-xl"
value={input}
placeholder="Say something..."
onChange={handleInputChange}
/>
</form>
</div>
);
}

It's important to clean up the global styles for a more visually appealing chat interface. By default, the Next.js page is dark. We clean up src/app/globals.css to make it readable:

@tailwind base;
@tailwind components;
@tailwind utilities;

Running the Chatbot Application

With the chat page in place, it's time to run our chatbot app and see the result of our hard work.

You can launch the development server by running the following command in your terminal:

npm run dev

You can now navigate to http://localhost:3000 in your browser to see the chat page. You can interact with the chatbot by typing messages into the input field. The chatbot will respond to your messages in real-time.

Below is a screenshot of what you can expect your chatbot interface to look like when you run the application:

Conclusion

And there you have it—a fully functional local chatbot built with Next.js, Ollama, and ModelFusion at your fingertips. We've traversed the path from setting up our development environment, integrating a robust language model, and spinning up a user-friendly chat interface.

The code is intended as a starting point for your projects. Have fun exploring!